logo

Adding Body Text to a Section: The WYSIWYG Editor

The main body of your section goes in the text area labeled “text.” You can enter as much text as you wish, but it’s best to include an amount of text that makes sense as a unit for layout purposes (see the articles on section layout and page layout).

The text editor in the Section module is a WYSIWYG ("what you see is what you get") editor, meaning that the editor displays the content that you're editing with the same formatting and styles that will appear on your website, as well as loading in any embedded media that you include.

Use the buttons and widgets available above the editable text area to format your content and engage editor features and modes. The editor will automatically apply the relevant HTML tags and display your content accordingly.

Fig A: WYSIWYG editor controls

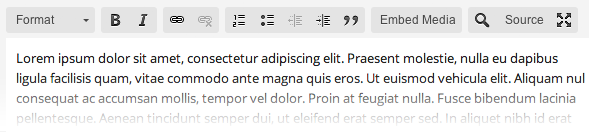
From left to right, the first item in the editor's controls is a drop-down format selector for applying heading, paragraph, DIV, and other similar formatting tags. The editor will automatically apply the tags to all text contiguous with the position of your editing cursor (the blinking vertical line), so make sure to set headings or other portions of text off from the rest of your content before selecting your desired format.

Next are the bold and italic buttons, which will apply b and i tags, respectively, to highlighted portions of text. If your editing cursor is within bold or italic text, clicking one of these buttons will remove the tags from all contiguous ltext with the relevant format. 

Clicking the link button will bring up AR5's link wizard and apply the resulting link to highlighted text. Next to it is the unlink button, which you can use to strip links from any linked text contiguous with your editing cursor.

The next two buttons allow you to create ordered and unordered lists. Highlighting a portion of text and clicking one of these buttons will create a list, automatically detecting units to treat as list items (most often these units will be paragraphs marked by p tags). Highlighting an existing list and clicking the relevant button will remove the list formatting, whereas clicking a list button while your editing cursor is within one list item will remove the list formatting from that item only. Right-clicking a list will allow you to acess list properties, where you can choose the type of character to use for each list item (different shapes for unordered lists and different counting characters for ordered lists).

With the two buttons to the right of the list buttons, you can indent and outdent units of content. To the right of them is the block quote button, which allows you to apply the block quote style to a unit of text.

Next is the "embed media" button, which will bring up a text area into which you can paste embed codes for maps, videos, or other content. The embedded media will appear wherever your editing cursor was when you clicked the embed button.

TIP: Line Breaks

When editing a Section, if you type RETURN it will create a new paragragh with multiple line breaks. However, if you type SHIFT+RETURN it will only create a single line break.

The button labeled with a magnifying glass brings up the find & replace wizard, which behaves similarly to the find & replace feature common in word processing software. 

The next button allows you to access the editor's Source mode, where you can view and edit the section's HTML code directly. Switching between the editor's Source and Preview modes or saving the section engages the editors Advanced Content Filtering feature, which automatically removes disallowed content from your HTML. Inline styles and images are the two most notable types of disallowed content, but you can of course always add an image to the section's image field or control styles in the stylesheets.

Next to the Source button is a button that allows you to bring the WYSIWYG editor into full screen mode. Click the button again to return to windowed mode.

Release Notes

Release Notes

5.1.0.5

5.1.0.5

3/6/2015 12:00:00 AM EST
9 years ago

AR5 Users,

The latest update to AR5 is now here, bringing with it a number of improvements to our suite of tools for front-end design. Themes have been expanded to include more types of page content, and you can now create and define custom module styles that you can apply, on the fly, to modules on the page. Let's take a closer look.

Video Tutorials

These short video tutorials provide an introduction to Agency of Record.