logo

Creating Pages: The Pages Index and Your Page Tree

Creating a New Page

You can create a new page from the Pages Index (see below) or from the subpages tab that's available on any page's details view

When you create a new page, a card will open up with several fields. In most cases, you'll need only to give the page an H1 Heading before you click save. After that, you'll be able to click on the name of the page that you just created, bringing you to its details page. On its details page, you'll be able to add content and publish the page (make it visible on your website).

Sometimes, however, you will need to change the other fields, particularly when you want to create a journal or forum. A breakdown of each field and its use can be found here

Navigation and Your Page Tree

The page tree that you set up will determine the experience that a user has on the front end while navigating your site. To make the connection between front-end navigation and the page tree straightforward, AR5 sites include three navigation areas by default, Nav 1, Nav 2, and Nav 3, that appear in the Pages Index as regular pages (see below) and serve as containers for groups of pages on your site. The three navigation pages correspond to three separate navigation menus on the front end that can be styled and positioned on your site in a variety of ways. Adding subpages to the three navigation pages will populate these menus.

Nav 1 is your primary navigation, where you put the main content pages on your site. In many cases, Nav 1 runs horizontally across the site, with the logo and masthead above it and the main page content below it. Building out this portion of your tree is probably the best place to start when just getting going with your site.

Nav 2 and Nav 3 often sit in the header (the very top of the page) and the footer (the very bottom of the page), respectively. As an example, Nav 2 might contain the home page and the contact us page, while the privacy policy, about us, and locations pages might sit in Nav 3. 

Note: You may want to include links to a single page in two navigations. To accomplish this, create pages under each of the two navigations, giving both pages the same name, and put your page content on just one of them. Then, edit the "page" card under the info tab of the page that you want to redirect "from" and, in the "redirect" field, choose the page you wish to redirect "to" (the one with content).

The Pages Index: Disclosure and Sorting

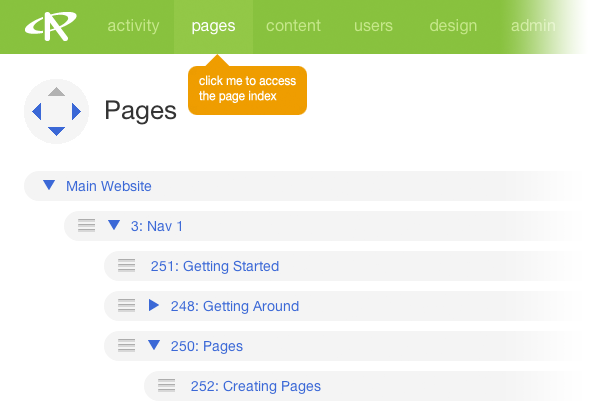
Building your page tree in AR5 starts with the Pages Index, where you can view your page tree as a nested list and make changes on the fly. Access the Pages Index by clicking on the pages menu item in the primary navigation

Each card in the Pages Index is a page on your website. Page cards that appear beneath another page card and indented represent subpages. 

When you first arrive at the Pages Index, you may find that the tree is collapsed or hidden. To open up a collapsed group of pages in your tree, click the blue disclosure arrow on the left side of a page card. Each disclosable group of pages is collapsed by default, but once opened, it will stay open until you close it again. Opening up the top-level card (usually labeled "Website") will reveal the three navigation areas introduced above, where you'll want to begin when adding pages.

You can easily change the order of pages or move a page to a different level in your tree by dragging and dropping. We reccomend that you hide the subpages of a page before you drag it to a new position.

The Pages Index: Page Card Actions

On the right side of each page card you will see three buttons: an addition sign, a subtraction sign, and a cog wheel

You can add a page to your tree by clicking the addition sign. A menu with two options will open. To insert a page on the same level as the page you clicked, choose "page." Your other option is to add a "subpage," in which case a new subpage will appear at the bottom of the list (if any) of existing subpages of the page you clicked.

You can delete a page with the subtraction sign button. You will be prompted to confirm before you delete any page. 

With the cog wheel button you can access a panel with action links:

  • The edit info link allows you to edit—in place, right on the pages index—page info such as the heading, the page redirect, and the friendly URL.
  • The edit meta link allows you to edit meta info and sitemap preferences for the page.
  • The go to details link brings you to the page's details page, where you can add page content.
  • The publish/unpublish link allows you to change whether the page is live on your website or whether it's only accessible using the special preview URL.
  • The preview link brings you to the front-end page in preview mode if it is unpublished, and to the normal, ID-based URL if the page is published.

Release Notes

Release Notes

5.1.0.5

5.1.0.5

3/6/2015 12:00:00 AM EST
9.72054794520548 years ago

AR5 Users,

The latest update to AR5 is now here, bringing with it a number of improvements to our suite of tools for front-end design. Themes have been expanded to include more types of page content, and you can now create and define custom module styles that you can apply, on the fly, to modules on the page. Let's take a closer look.

Video Tutorials

These short video tutorials provide an introduction to Agency of Record.